Easy Quick Pickled Radishes Vibrant Flavor Crunch
Easy Quick Pickled Radishes are about to become your new favorite kitchen magic trick. Have you ever stared at a bunch of vibrant radishes and wondered what to do with them beyond slicing them thinly onto a salad? Well, prepare to be delighted! These little gems transform from humble root vegetables into bright, zesty flavor bombs in mere minutes. What’s not to love about a recipe that’s both incredibly simple and yields such a delicious payoff? The crisp, slightly peppery bite of raw radishes is elevated by a tangy, vinegary brine, creating a snack or condiment that adds an immediate punch to everything from tacos and sandwiches to charcuterie boards and grain bowls. What truly makes these easy quick pickled radishes so special is their versatility and speed; you get all the satisfying crunch and vibrant flavor of traditional pickles, but without the long wait. It’s the perfect way to add a burst of freshness and acidity to any meal.

Easy Quick Pickled Radishes
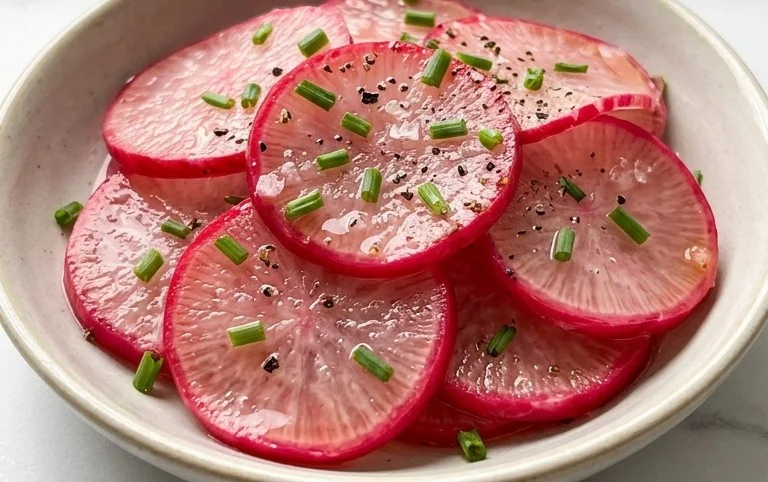
Looking for a way to add a vibrant punch of flavor and a delightful crunch to your meals? Look no further than these easy quick pickled radishes! They’re incredibly simple to make, require minimal active time, and transform humble radishes into a versatile condiment. Forget those sad, limp radishes; pickling them awakens their peppery notes and turns them into something truly special. I love keeping a jar of these in my fridge at all times. They are perfect for topping tacos, brightening up salads, adding a zesty kick to sandwiches, or even just enjoying straight from the jar as a healthy snack. The beautiful pink hue they develop is also a feast for the eyes!
Ingredients:
- 1/2 jalapeño pepper (thinly sliced)
- 6 cups radishes (sliced into rounds)
- 2 cups red onion (thinly sliced)
- 2 1/2 cups rice vinegar
- 2 cups water
- 1/2 cup sugar
- 2 teaspoons sea salt
Getting Started: Preparing Your Radishes and Other Veggies
The first step to pickling perfection is prepping your star ingredients. You’ll want to start with fresh, firm radishes. Give them a good wash to remove any dirt, and then trim off the greens and the root end. Don’t toss those greens just yet – they can be used in pesto or sautéed! For this recipe, we’re slicing the radishes into thin rounds. Aim for about 1/8 to 1/4 inch thick. This thickness allows them to absorb the pickling brine efficiently while still retaining a pleasant bite. A mandoline slicer can be a lifesaver here for achieving uniform slices, but a sharp knife and a steady hand will work just as well.
Next up, the red onion. We’re going to slice this thinly as well, aiming for crescent-moon shapes or fine rings. Thin slices will ensure they soften nicely and meld their flavor into the brine without being overpowering. Finally, prepare your jalapeño. For a bit of heat, we’ll thinly slice half a jalapeño. If you prefer a milder pickle, you can remove the seeds and membranes before slicing, as this is where most of the capsaicin resides. If you’re feeling adventurous and love a good kick, leave them in!
Crafting the Perfect Pickling Brine
Now for the heart of our quick pickles: the brine. This is where all the magic happens, transforming simple vegetables into tangy, delicious morsels. In a medium saucepan, combine the rice vinegar, water, sugar, and sea salt. Rice vinegar is a fantastic choice for pickling because it has a mild, slightly sweet flavor that doesn’t overpower the vegetables. It’s less acidic than white distilled vinegar, making for a more delicate pickle.
Place the saucepan over medium heat. We’re going to stir the mixture gently until the sugar and salt have completely dissolved. You don’t need to bring it to a rolling boil; a gentle simmer is all that’s required to help everything incorporate smoothly. Stirring is key here to ensure there are no gritty bits of sugar or salt at the bottom of the pan. This step ensures that the brine is evenly seasoned and ready to work its magic.
The Pickling Process: Combining and Waiting
Once your brine is prepared and the sugar and salt are fully dissolved, it’s time to assemble your pickles. Grab a clean, heat-safe jar or a large bowl. You can use glass mason jars, which are ideal for storage, or a non-reactive ceramic or glass bowl if you plan to consume them within a day or two. Make sure your container is large enough to comfortably hold all the radishes, red onion, and jalapeño.
Carefully add your sliced radishes, red onion, and jalapeño to the jar or bowl. Try to distribute them evenly. Now, gently pour the warm pickling brine over the vegetables. Ensure that all the vegetables are fully submerged in the brine. This is crucial for even pickling. If some vegetables are peeking out, you might need to press them down gently with a spoon or add a touch more brine (though this is unlikely with these quantities).
Patience and Enjoyment: The Waiting Game
This is where the “quick” part of quick pickled radishes really comes into play. Unlike traditional canning, which involves long simmering times and sterilization, quick pickling relies on the refrigerator to do the work. You’ll want to let the mixture cool down to room temperature on the counter for about 30-60 minutes. This initial cooling period allows the vegetables to start absorbing the flavors of the brine while they’re still warm.
Once cooled, cover the jar or bowl tightly and transfer it to the refrigerator. The magic happens in the fridge! You’ll start to notice the radishes and onions softening and taking on a beautiful pinkish hue as they soak up the tangy brine. For the best flavor, I like to let them pickle for at least 2-3 hours. However, for a more pronounced flavor and texture, I recommend leaving them overnight. The longer they sit, the more infused they become with the delicious pickling liquid. You can absolutely taste-test after a couple of hours to see if they’ve reached your desired level of tanginess and crunch.
These quick pickled radishes are incredibly versatile. They are a fantastic addition to any meal that needs a bright, acidic counterpoint. Sprinkle them over avocado toast, add them to a charcuterie board, or use them as a vibrant garnish for grilled meats and fish. Their shelf life in the refrigerator is typically about 2-3 weeks, so you can enjoy their delightful crunch and flavor for quite some time. Happy pickling!
Conclusion:
And there you have it – a simple yet incredibly satisfying way to elevate your meals with these Easy Quick Pickled Radishes! This recipe is a true gem because it transforms humble radishes into a vibrant, tangy, and slightly peppery condiment in practically no time at all. The beauty lies in its speed and minimal ingredients, making it perfect for even the busiest weeknights. I love having a jar of these on hand to add a burst of freshness and crunch to almost anything. Think of them as your secret weapon for instant flavor! They’re fantastic piled high on tacos, nestled into sandwiches, mixed into a vibrant salad, or even as a bright accompaniment to richer dishes like grilled meats or creamy dips. Don’t be afraid to get creative with your own flavor profiles too – adding a pinch of red pepper flakes for a kick, a sprig of dill for an herbaceous note, or even a sliver of garlic can create entirely new delicious dimensions. I truly encourage you to give this quick pickled radish recipe a try; you might be surprised at how often you reach for it!
Frequently Asked Questions:
Q1: How long do these pickled radishes last in the refrigerator?
These easy quick pickled radishes will generally stay fresh and delicious in an airtight container in your refrigerator for about 2 to 3 weeks. The texture might soften slightly over time, but the flavor will remain wonderfully tangy. It’s always best to use a clean utensil when taking them out to help maintain their quality.
Q2: Can I use different types of radishes for this recipe?
Absolutely! While classic red radishes are most common and provide a beautiful color, feel free to experiment with other varieties. Daikon radishes, watermelon radishes, or even French breakfast radishes will work beautifully and offer slightly different textures and subtle flavor nuances. Just slice them to a similar thickness for consistent pickling.
Q3: What if I don’t have white vinegar? Can I substitute it?
Yes, you can. While white vinegar provides a clean, sharp tang, apple cider vinegar is a great substitute and will impart a slightly fruitier flavor. Rice vinegar is another excellent option, offering a milder, more delicate acidity. Experiment with what you have on hand!
Easy Quick Pickled Radishes
A fast and flavorful recipe for pickled radishes, perfect as a vibrant condiment for tacos, sandwiches, or salads. These quick pickles offer a delightful crunch and a tangy, slightly spicy kick.
Ingredients
-
1/2 jalapeño pepper (thinly sliced)
-
6 cups radishes (sliced into rounds)
-
2 cups red onion (thinly sliced)
-
2 1/2 cups rice vinegar
-
2 cups water
-
1/2 cup sugar
-
2 teaspoons sea salt
Instructions
-
Step 1
Prepare your vegetables: Thinly slice the jalapeño pepper and red onion. Slice the radishes into uniform rounds. -
Step 2
Combine the brine ingredients: In a medium saucepan, whisk together the rice vinegar, water, sugar, and sea salt. Heat over medium heat, stirring until the sugar and salt are completely dissolved. Do not boil. -
Step 3
Pack the jars: Tightly pack the sliced radishes, red onion, and jalapeño slices into clean jars. Leave about 1/2 inch of headspace. -
Step 4
Pour the brine: Carefully pour the warm brine over the vegetables in the jars, ensuring they are fully submerged. Tap the jars gently to release any air bubbles. -
Step 5
Cool and refrigerate: Let the jars cool to room temperature. Once cooled, seal the jars tightly and refrigerate. The pickles will be ready to eat after at least 30 minutes, but are best after a few hours or overnight.
Important Information
Nutrition Facts (Per Serving)
It is important to consider this information as approximate and not to use it as definitive health advice.
Allergy Information
Please check ingredients for potential allergens and consult a health professional if in doubt.